Thursday, January 19, 2012

Street Fashion Photography Tips

Shooting five to ten street fashion brands a day in a three to four hour window is a tough call for any experienced photographer. Professional photographer Nick Fancher does this day in day out and shares with us, some of the ways he maximizes his shooting efficiency, using a lightweight kit and his own lighting creativity in this tutorial video:


The first brand Nick tackles is Entrée, a street brand. Working on a derelict lot with harsh light, Nick is looking for a stylized look to emphasize the street look of the clothes. His setup:


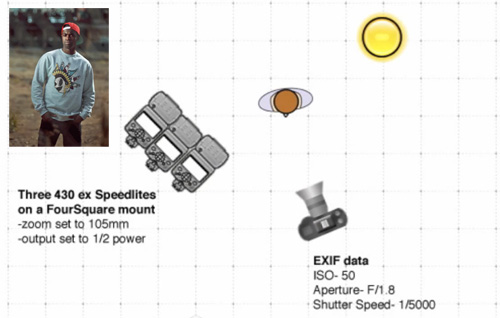
Lighting setup to emphasize the street look

  • Three radio controlled flashes together on one stand, with the output set manually to half power.
  • The flashguns focus length was each set to 105mm to get a more direct light.
  • With the Canon’s high speed sync he was able to use a very high shutter speed of 1/5000 of a second allowing him to darken the background creating a gritty, urban look and punching out the colors in the models clothes.
  • By positioning the flashlights directly towards the sun, Nick was able to use the sun itself as a keylight and because of the high shutter speed he could use a wide aperture to throw the background out of focus.

The second brand Nick tackled was Saucony, a more sports oriented brand. Shooting their sports shoes required a clean look that was helped by a good sunny day. His techniques for this were:


Lighting setup to achieve a clean look

  • Shooting on a basketball court he was able to use the sunlight passing through a chain-link fence, to provide a creative shadow pattern as a background.
  • To emphasize the clean look he goes for a deep depth of field using an aperture of f11.
  • The shoes are rimlit from either side using radio-controlled flashlights, again set to 105mm, to tunnel the light towards the subject.
  • A third flashgun is used more or less in front of the shoes. This flash is zoomed out to around 24mm to provide a softer fill in light. The sunlight from the rear provides the keylight.

In his third shoot, Nick is tasked to photograph Palladium shoes and requires an urban look. Shooting from a rooftop, Nick uses the cityscape as a backdrop but uses a mid range aperture to soften the background and keep the emphasis on the shoes. To achieve the required look:


Configuration of lighting for urban shoes

  • He rimlights the shoes from either side using flashlights set to 105mm.
  • To fill in he fires a third flash from directly above the shoes with a setting of 24mm and set manually to ¼ power.

For Palladium, he is again on a rooftop, but has two models, both of whom need to be individually lit. This time he uses just two flashes:


Lighting two models in one shot

  • The rear model is lit from one side with a flash set to 105mm.
  • The front model is lit from the opposite side with the flash set to 24mm to soften its effect.
  • Using a mid range aperture, he has kept both models in focus but thrown the background out slightly.

The last shoot for Howler Brothers is shot simply with one on-camera flash:


Simple on-camera flash to fill shadows


  • Dialed again to 105mm the flash punches a nice direct light onto the model with enough power to stop the aperture down, punch out the skies and saturate the colors.

Nick Fancher as he packs in several locations to a four-hour shoot. One of the key aspects of lifestyle fashion photography is finding the right locations, Nick has a wide selection that he uses on a regular basis but is always on the look out for something new and fresh

He starts his day this time with a shoot for Levi’s. Using a location as a simple as a downtown parking lot, Nick manages to find numerous interesting places to create an interesting, urban backdrop. For this shoot he uses available light at first, but to add a more dramatic look he:


Dramatic light street portrait setup

  • Uses a cluster of three flashguns mounted on one stand, triggered wirelessly.
  • The flashguns were raised above the model and to the side with a medium output to prevent the flashlight overpowering the ambient light.
  • As a secondary style Nick reverts to a direct camera mounted flash, which combined with a gritty background has created a more “street” look to the images.


Single on-camera flash with gritty background

The second brand of the day was a more contemporary, high fashion style. Nick utilizes the parking lot again but this time from the top floor, where the city skyline provides a modern, urban background to the images:


Lighting setup for contemporary style

  • Using a cluster of four flashes controlled from a camera mounted wireless unit, Nick uses high speed sync to give a wide aperture of f1.8, throwing the background out of focus with a dark and moody feel
  • As before the flashguns are manually set to a focal length of 105mm and a ¼ power.
  • He highlights the model using low sun as an auxiliary rim light.

Using the same location Nick’s next shoot is of a limited edition Reebok sports shoe. To emphasis the color:


Configuration of lights to emphasize color

Nick has lit the shoes from either side using flash and combined the grey tones of the city skyline with a backlighting sun to punch out the color in the shoes.By closing down the aperture, he has darkened the background.

Palladium manufacture, military style shoes and for this shoot Nick uses the model to showcase the shoes:


Shot setup to showcase military style shoes

  • He uses the sun as a back-light.
  • Then uses two flashguns positioned in front and above the shoes and carefully maneuvered the camera to create an interesting lens flare in the background.
  • The flashes were set to 24mm to soften the front light effect.

For the final shoot of the day, Nick uses a newly built suspension bridge as a location and shoots purely with the available light from the already low sun.

So in summary, to get professional looking, street fashion images in a short time frame travel light, consider using two or three wireless controlled flashguns for flexible lighting setups. Adapt to the scene and let available light do some of the work for you. If you can, scout out great locations before you shoot, perhaps doing some test shots with a compact camera. This will allow you to concentrate your time on the actual shoot when the time comes.


--------------------------------------------------------------------------------------------------
Liked this? Then share this page and subscribe to get the top stories of the week, plus the most popular reviews delivered straight to your inbox.

And don’t forget to give us your suggestions in the comments!


View the original article here

What Type of Lens to Use for Specific Situations?

The lens is the “eye” of your camera and plays the key role in capturing clarity, color and details of each image. Whether you are a specialized or a beginner photographer choosing right lens will definitely elevate your photography. With a point and shoot type of camera the lens is fixed which cannot be removed or replaced. Digital SLR cameras offer lens mounts where you can swap and use different type lenses.


"photographer" captured by Chanmee Gloria Kim (Click Image to See More From Chanmee Gloria Kim)

Before diving into available types, the definition of focal length and the extend of the reach will help to clarify digital SLR lenses. When the subject of an image is in focus, focal length measures the distance between optical center of the lens and the digital camera sensor. It is measured in millimeters and displayed on the actual lens. For example a standard focal length is expressed as 1.4f.

Another useful information found on a lens is the extend of its reach: (From 35mm- To 80mm),(50-100mm), (200-400mm),and so on.

AVAILABLE TYPES:

Lens types are classified as “Prime” which comes with fixed focal length and “Zoom” which has variable focal length.

Prime includes sub group of Standard (35- 80mm), Wide-Angle (15-28mm), Macro (50-100mm), Telephoto (80- 300mm) and Super Telephoto lenses (200-400mm).


Zoom comes with variations like: Wide-Angle to Telephoto or Standard to Telephoto coverage.

Even the point and shoot type of digital camera comes with a Standard 35- 80mm lens. Standard lens is also known as “normal-lens” The term “normal” is used for this type because it captures a scene just as the human eye sees it. Standard lens is great for everyday shots, such as flowers, people, or pets.


Wide-angle gives a broader view of a scene than a standard lens does. Because this lens captures a wide area it is used for photographing groups of people and landscapes.


Telephoto is used to enlarge pictures or for bringing distant subjects closer. A common telephoto comes with 75- 300 mm coverage. When you begin to move from the 35mm into something larger it is best to either use a tripod or a stabilizer. A stabilizer will help you hold the camera steady for clear shots even if your hand moves a little bit.


Super telephoto comes with 200-400mm lens. It is mostly used for capturing wild life or birds.

A Macro lens is designed to capture a tiny subject as a bigger image. Macro Photography is a type of shooting that magnifies the size of a subject. As it name implies it is great for close up shots, such as flowers, spider webs, insects and other small objects.


Digital zoom simply crops the image to a smaller size, and then enlarges the cropped portion to fill the frame.


Optical zoom works just like a digital zoom. The lens changes focal length and increase magnification as it is zoomed.

HELPFUL VIDEO ON THIS TOPIC:


What of lens should you use ?

  • For general shots like People, Pets, Flowers choose Standard.
  • For Large Group of People use Wide Angle.
  • For Landscapes use Wide Angle.
  • For Architecture Shots choose Wide Angle.For Action and Sports use Telephoto.
  • For Portraits the Standard lens works best however you can also use Telephoto.
  • For Wild Life and Bird Photography use Super-Telephoto.
  • For Close-Up shots and Tiny objects use Macro.

In the photography world lenses are maybe a small piece of equipment but they help to capture “better images”.

About the Author:
Zoe Shaw is from digitalphotoworks.net. Click here for more free digital DSLR tips and techniques.


--------------------------------------------------------------------------------------------------
Liked this? Then share this page and subscribe to get the top stories of the week, plus the most popular reviews delivered straight to your inbox.

And don’t forget to give us your suggestions in the comments!


View the original article here

Wedding Photographer Assistant Tips


Photo captured by Tatiana Garanina (Click Image to See More From Tatiana Garanina)

Before I go into what the requirements are on the wedding day from a second photographer, it would be a good idea to think about what should be considered before the day.

First things first, you may be someone who is trying to get work as a second photographer to get started in the industry before launching into a wedding as a lead photographer.

This can often be difficult so be prepared to travel to an area outside what would be considered your territory. Photographers are business people and are always wary of training a competitor, but they may also be looking for a regular second who they can trust and work with.

Find out about the principal photographer’s style. The main photographer will have been booked based on things such as style of images, personality and customer service. So it would be sensible to find out a bit about the lead. Find out their dress code and be respectful of it even if it is not your normal dress code.
Prepare your equipment, make sure it is clean, batteries charged, cards formatted if using your own and find out if the principal photographer requires your cameras time to be synchronized.

So on the day, make sure you are very punctual, fairly obvious really, but if it is somewhere you haven’t been before do a bit of preparation to know the area. Google street mapping is often a useful tool for research and during my time as a wedding photographer in Lancashire, it has proven to be invaluable. Then comes the time meeting the wedding party for the first time. Be confident, polite and respectful to everyone, including other vendors that are part of the day. You may be thinking this is all obvious, but little things can often be forgotten when nerves and pressure kick in.

Now we come to the working side of the day and I will break these down to bullet points. There may be other things that can be added to the list, but these are the ones that I consider important.

IMPORTANT TASK TO CONSIDER

  • Be an assistant to the main photographer. Running errands, gathering guests for groups, moving kit around, watching kit, hold reflectors, flashes, video lights and generally any task that is asked of you.
  • Get the shots you are asked to get and inform the lead when you have them.
  • Take the camera away from your eyes and look around for the reportage shots, kids playing, different angles that can make a shot look natural and details that the main photographer may not see.
  • Watch for things that the main photographer may miss, background distractions is one example.
  • Get detail shots that may be of use for album design as background images.


 "Karina & Roman" captured by Elena Zotova (Click Image to See More From Elena Zotova)

  • Be prepared to take the lead in the event of main photographer having to break away. This may be the scary part, but act with confidence and it will be fine.
  • Be aware of what the main photographers plans are, remind him/her if you think something has been missed. It will be appreciated that you are showing you are thinking about what is happening.
  • Finally for the ‘to do’s, think ahead. If you think the need for a reflector is coming, get it to hand, if you know the need for a tripod is coming, get it and extend the legs in preparation, but most importantly, learn something every time and enjoy it. You will be part of a team so make sure you work that way.

NOW FOR SOME OF THE DO NOTS:

  • If you have your own photography business, don’t give out your cards or try and drum up your own business. They are not your clients and that is to be respected at all times.
  • Do not shoot like the paparazzi unless you are specifically told to. The main photographer would rather a smaller set of well executed, high quality shots than a thousand shots taken in the hope of 20% being successful.
  • Do not just shoot over the shoulder of the main photographer to get some portfolio shots unless permission has been gained. It can be very off putting if it hasn’t been discussed. If it has been agreed in advance, then the main photographer will have just to inform clients that some training is taking place.
  • Do not publish images on blogs etc without permission from the main photographer. If permission is given, credit the main photographer. The copyright remains with the photographer/business that you are working for.
  • Do not chew gum, smoke, drink alcohol, swear etc if that is what is requested by the main photographer.


"Olga" captured by Olesia Kliots (Click Image to See More From Olesia Kliots)

So these are just a few of the basic things to be considered and this list can be added to. So hopefully this may be of help to some and that it will help you to be an asset if you are a second shooter at any time.

About the Author:

Paul Brown produces quality wedding photography in Lancashire and is also a principal wedding photographer with Yorkshire & Lancashire wedding photographer, Mark Pearson Photography.

The 2nd photographer may also need to take over if the lead photographer has an urgent issue or emergency come up. Such as in this case where the primary photographer was caught off guard by a fountain


Good luck and have fun.


--------------------------------------------------------------------------------------------------
Liked this? Then share this page and subscribe to get the top stories of the week, plus the most popular reviews delivered straight to your inbox.

And don’t forget to give us your suggestions in the comments!


View the original article here

How to Change Mood in a Photograph

Posted on 23 December 2011 by Sean Farmer

The mood in a photo can define the entire photograph. A dark and somber, or even pensive photograph’s mood is typically set by a low key, but if you take the same photograph and shoot it in high key, it can completely change the photograph making it seem light hearted and fun. While it’s important to get the mood right when you shoot by setting the lighting, using filters, or whatever else you need to accomplish the mood you want, sometimes it is not possible, especially in outdoor and location photography. So here is a good method you can do in Photoshop to change the mood of a photograph to better suit what you truly wanted to capture.


I will start with this image, and change its mood to a more Dark and Urban mood.

1) Create a new Empty layer, and fill it with your secondary tone.
This layer will provide a secondary color tone for your image. In the image I am working with I chose to use a darker brown to compliment the models skin color as well as create a darker undertone. Once you’ve created this layer you will need to set its blending mode to Soft Light, and reduce the Fill to somewhere between 25-40%, depending on the strength of the undertone you want. For the image I am using I set the Fill to 37%

Image after adding a Brown toner layer.

2) Create another new Empty layer, and fill it with your primary tone.
This layer will work much like the first, except that the color used in this layer will be the primary tone used to create the mood of the photograph. You will need to set the Blending Mode of this layer to Soft Light and the fill between 50-80%. Typically, I find it best to chose a percentage almost double that of your previous color (I set mine here to about 70%). The color you choose here should directly affect the mood you are trying to create. For example, in my image I am trying to create a darker urban feel, so I decided to use a dark green that complements the previous layers brown.


Image after adding a green toner layer.

3) Merge all of the images together to create a single composite image, then Duplicate it. Once you’ve duplicated the composite image add a Gaussian Blur of about 4.1 to the duplicate. Make sure the duplicates Blending mode is set to Normal, and change the opacity to anywhere between 50-70% and the Fill to between 60-80%. This will create a more surreal look to your image, without drastically changing it. In my image I set the Opacity to 67% and the Fill to 73%.


Final image after adding the gaussian blur.

And that’s it. With these few simple changes you can drastically alter the mood of an image.
The Before and After:


--------------------------------------------------------------------------------------------------
Liked this? Then share this page and subscribe to get the top stories of the week, plus the most popular reviews delivered straight to your inbox.

And don’t forget to give us your suggestions in the comments!


View the original article here

HDR Photos in a Snap

Posted on 19 December 2011 by MatthewBamberg

All the rage today in photography is the HDR shot. Everyone wants a piece of the surreal action. I say surreal because much of the time the effect is just that—a surreal looking image a la Salvador Dali (well close, maybe).

Most photographers will say that you need a tripod in order to take a shot, and you do if you don’t know how to set your camera to Auto Exposure Bracketing (AEB).
If you do, you can get an HDR photo in minutes—take the shots and quickly process the when you get back home in Photoshop CS 5’s HDR Pro.

AEB enables your camera to take 3 images at once: one normally exposed, one underexposed and one overexposed.


Normal exposure


Underexposed


Overexposed

Canon models will only take three shots when in AEB mode. Other model cameras can take more, but all you need is three.

In order for you to get an idea about how to set your camera to AEB mode for a Canon camera, here are the directions for the 5D. Follow the directions in the manual if you’re using another model or make of camera
The first thing you do is press on “Menu.” Then you navigate to “AEB” using the dial at the top of the camera.

Next, press the set button. It’s in the middle of the large dial on the back of the camera.
The AEB will light up on the menu and you can set where you want the three shots by turning it and watching where the three indicators are. For an HDR set, +2, 0, -2 is a good choice.

Finally, shoot by holding down the shutter release until the shooting stops. It will after three shots.

The shots will be taken in the following order: normal exposure, underexposed and overexposed.
To go back to shooting normally, turn the settings dial to “B” and then go back to Av (or whatever setting you like to shoot at).

This process works find on a sunny and bright summer days. You risk camera shake blur in the shot you are overexposing because in order to overexpose the shutter has to stay open longer.

If you’re going to shoot with a tripod inside or in low light, it’s best to use a tripod. In this case I don’t recommend AEB (unless you’re using a remote) because there is a likelihood that the camera will shake when you are holding the shutter release down due to the extra time the shutter needs to remain open, especially when you overexpose.

Also, keep in mind that the AEB mode doesn’t work with the camera’s built-in timer.
The last step of the HDR process is to download the three photos to your computer and run them through Photoshop CS5’s HDR Pro.


Final HDR photo tweaked and cropped
Image by Matthew Bamberg


--------------------------------------------------------------------------------------------------
Liked this? Then share this page and subscribe to get the top stories of the week, plus the most popular reviews delivered straight to your inbox.

And don’t forget to give us your suggestions in the comments!


View the original article here