Posted on 23 December 2011 by Sean Farmer
The mood in a photo can define the entire photograph. A dark and somber, or even pensive photograph’s mood is typically set by a low key, but if you take the same photograph and shoot it in high key, it can completely change the photograph making it seem light hearted and fun. While it’s important to get the mood right when you shoot by setting the lighting, using filters, or whatever else you need to accomplish the mood you want, sometimes it is not possible, especially in outdoor and location photography. So here is a good method you can do in Photoshop to change the mood of a photograph to better suit what you truly wanted to capture.

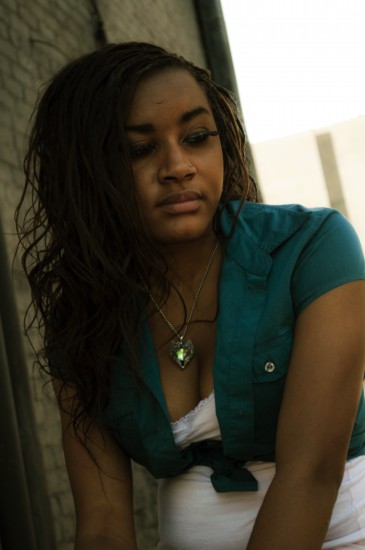
I will start with this image, and change its mood to a more Dark and Urban mood.
1) Create a new Empty layer, and fill it with your secondary tone.
This layer will provide a secondary color tone for your image. In the image I am working with I chose to use a darker brown to compliment the models skin color as well as create a darker undertone. Once you’ve created this layer you will need to set its blending mode to Soft Light, and reduce the Fill to somewhere between 25-40%, depending on the strength of the undertone you want. For the image I am using I set the Fill to 37%

Image after adding a Brown toner layer.
2) Create another new Empty layer, and fill it with your primary tone.
This layer will work much like the first, except that the color used in this layer will be the primary tone used to create the mood of the photograph. You will need to set the Blending Mode of this layer to Soft Light and the fill between 50-80%. Typically, I find it best to chose a percentage almost double that of your previous color (I set mine here to about 70%). The color you choose here should directly affect the mood you are trying to create. For example, in my image I am trying to create a darker urban feel, so I decided to use a dark green that complements the previous layers brown.

Image after adding a green toner layer.
3) Merge all of the images together to create a single composite image, then Duplicate it. Once you’ve duplicated the composite image add a Gaussian Blur of about 4.1 to the duplicate. Make sure the duplicates Blending mode is set to Normal, and change the opacity to anywhere between 50-70% and the Fill to between 60-80%. This will create a more surreal look to your image, without drastically changing it. In my image I set the Opacity to 67% and the Fill to 73%.
Final image after adding the gaussian blur.
And that’s it. With these few simple changes you can drastically alter the mood of an image.
The Before and After:

View the original article here
The mood in a photo can define the entire photograph. A dark and somber, or even pensive photograph’s mood is typically set by a low key, but if you take the same photograph and shoot it in high key, it can completely change the photograph making it seem light hearted and fun. While it’s important to get the mood right when you shoot by setting the lighting, using filters, or whatever else you need to accomplish the mood you want, sometimes it is not possible, especially in outdoor and location photography. So here is a good method you can do in Photoshop to change the mood of a photograph to better suit what you truly wanted to capture.

I will start with this image, and change its mood to a more Dark and Urban mood.
1) Create a new Empty layer, and fill it with your secondary tone.
This layer will provide a secondary color tone for your image. In the image I am working with I chose to use a darker brown to compliment the models skin color as well as create a darker undertone. Once you’ve created this layer you will need to set its blending mode to Soft Light, and reduce the Fill to somewhere between 25-40%, depending on the strength of the undertone you want. For the image I am using I set the Fill to 37%

Image after adding a Brown toner layer.
2) Create another new Empty layer, and fill it with your primary tone.
This layer will work much like the first, except that the color used in this layer will be the primary tone used to create the mood of the photograph. You will need to set the Blending Mode of this layer to Soft Light and the fill between 50-80%. Typically, I find it best to chose a percentage almost double that of your previous color (I set mine here to about 70%). The color you choose here should directly affect the mood you are trying to create. For example, in my image I am trying to create a darker urban feel, so I decided to use a dark green that complements the previous layers brown.

Image after adding a green toner layer.
3) Merge all of the images together to create a single composite image, then Duplicate it. Once you’ve duplicated the composite image add a Gaussian Blur of about 4.1 to the duplicate. Make sure the duplicates Blending mode is set to Normal, and change the opacity to anywhere between 50-70% and the Fill to between 60-80%. This will create a more surreal look to your image, without drastically changing it. In my image I set the Opacity to 67% and the Fill to 73%.

Final image after adding the gaussian blur.
And that’s it. With these few simple changes you can drastically alter the mood of an image.
The Before and After:

--------------------------------------------------------------------------------------------------
Liked this? Then share this page and subscribe to get the top
stories of the week, plus the most popular reviews delivered straight to your
inbox.
And
don’t forget to give us your suggestions in the comments!
View the original article here
1 comment:
propecia cost propecia side effects impotence - can you buy propecia thailand
Post a Comment